Changing a ceiling lamp holder: It is one of those home maintenance tasks that most people steer clear of because of the fear of invisible wires and high-voltage sparks. However, a revolutionary check has surfaced that is changing how homeowners approach basic electrical repairs without calling for professional help.
This simple inspection takes less than sixty seconds but eliminates the confusion that leads to most DIY fails. By understanding this single hidden detail, you can transform a frustrating afternoon project into a quick five-minute victory that keeps your home bright and your wallet full.

Modern electrical systems are designed to be user-friendly, yet many people still find the sight of bare wires intimidating. The secret lies not in the tools you use, but in recognizing the specific “alignment marker” that dictates how your new fixture connects to your home’s internal wiring.
The Secret Hack: Identifying the Grounding Bridge
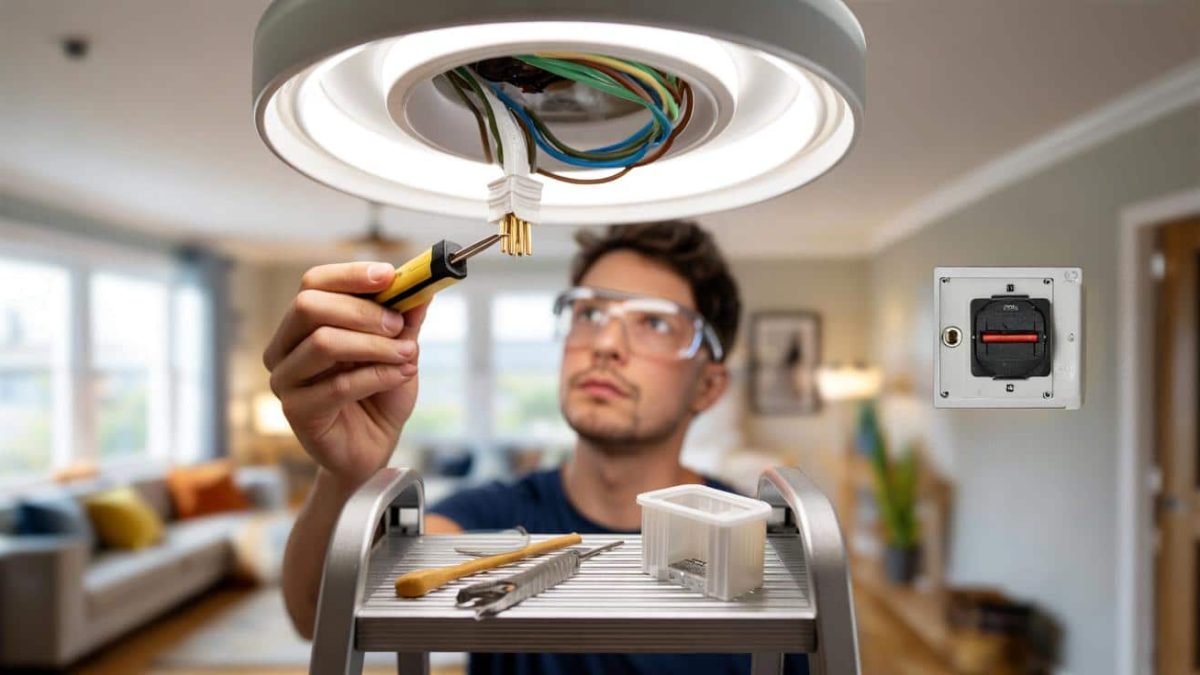
The most common reason people fail when swapping a lamp holder is getting lost in the “spider web” of existing wires. The shocking hack that professional handymen use is checking for the Grounding Bridge. This is a small metal tab or notched rail located on the back of the mounting plate that many amateurs completely overlook.
Before you even unscrew the old fixture, identifying where this bridge aligns with your junction box simplifies the entire process. It serves as a physical map for where every other wire must go. If you align the bridge first, the rest of the wires naturally fall into place without any guesswork or checking complex diagrams.

Most people start by pulling wires out, but the pro-level trick is to leave the wires tucked in and only inspect the mounting bracket geometry. This single check ensures that your new lamp holder will sit flush against the ceiling every single time, preventing the “wobbly light” syndrome that plagues many DIY attempts.
Common Electrical Challenges in Modern Homes
Home electrical systems have evolved, yet the basic physics of lighting remains constant. Many older homes feature a mix of wiring types that can confuse even the most confident homeowner. Understanding the load capacity and the physical condition of your insulation is the first step toward a successful installation.
When you open up a ceiling fixture, you might encounter dust, heat-damaged plastic, or stiff copper. The table below outlines what you are likely to find and how to handle it during your lamp holder swap to ensure a breeze-like installation.
| Feature | Standard Condition | Warning Sign |
|---|---|---|
| Wire Color | Black/Red and White | Cracked or brittle casing |
| Mounting Screws | Silver or Brass finish | Heavy rust or stripped heads |
| Junction Box | Securely fastened to joist | Loose or hanging by wires |
| Connector Pins | Firm and non-moving | Loose “wiggle” when touched |
“Safety in home electrical work often comes down to preparation rather than physical skill. Homeowners who spend ten minutes verifying their power source and checking the mounting alignment avoid ninety percent of the common errors found in professional repair audits.”

Step-by-Step Guide to the One-Check Method
The “One-Check” method revolves around the neutral-to-shell continuity. Before you bring the new part to the ceiling, look at the base of your new lamp holder. Locate the silver screw. In almost every modern fixture, the silver screw connects to the threaded shell of the bulb socket.
This is the critical detail: Always match your white wire to that silver screw. If you do this one check, you ensure that the “hot” part of the socket is buried deep inside where you can’t accidentally touch it while changing a bulb later. It is a safety hack and an installation hack rolled into one.
Next, ensure the mounting strap is horizontal. Many people struggle to screw the lamp holder in because the bracket is tilted. Use your fingers to level the bracket before trying to lift the heavy fixture. This small adjustment makes the final screws glide in without any resistance.
Why You Do Not Need an Electrician for This
For decades, we have been told that any wire-related task requires a licensed professional. While major panel work definitely does, a ceiling lamp holder is essentially a plug-in device that uses screws instead of a wall outlet. It is a surface-level repair that requires no cutting of the main lines.
By using the “One-Check” hack, you are essentially following a color-coded roadmap. As long as the power is off at the breaker, there is no risk of shock. The simplicity of the internal components means there are no moving parts to break or complex circuits to fry during the installation.
Saving the money on a service call allows you to invest in higher-quality LED fixtures or decorative holders that improve your home’s value. The confidence gained from finishing this task often leads homeowners to tackle other small repairs, fostering a sense of self-reliance.
“The psychological barrier to electrical work is often higher than the physical one. Once a person realizes that wires are simply color-coded paths for energy, the mystery disappears and they can perform basic maintenance with total precision.”
Preparing Your Workspace for Success
A common mistake is trying to work with your arms over your head for too long. To make this a breeze, set up a stable ladder so your chest is level with the ceiling. Working with your hands at eye level reduces fatigue and prevents you from dropping small screws into your carpet.
Gather your tools beforehand: a non-contact voltage tester, a screwdriver, and a pair of pliers. The voltage tester is your best friend. It gives you an audible ‘beep’ to confirm the power is truly dead, providing the peace of mind needed to work calmly and accurately.
Keep a small magnetic tray or even a piece of tape nearby to hold the mounting screws. Most people lose the screws in the time it takes to swap the wires, forcing a trip to the hardware store that ruins the “quick fix” momentum.
The Final Inspection: The “Tug Test”
Once the wires are connected and the lamp holder is screwed into the ceiling, there is one final check. The “Tug Test” ensures that your connections are solid and won’t vibrate loose over time. Lightly pull on the wires before you tuck them into the box to make sure the terminal screws are biting the copper.
If the wire moves, tighten the screw. A loose connection is the primary cause of flickering lights and heat buildup. Making sure everything is snug and secure is the hallmark of a professional-grade DIY job.
Finally, restore the power and flip the switch. With the “One-Check” hack, your light should jump to life instantly. You have successfully updated your home’s lighting, saved a hundred dollars or more, and mastered a skill that will last a lifetime.
“Modern lamp holders are manufactured to strict tolerances. When a homeowner understands the basic alignment of the mounting bridge, they are essentially performing the same sequence of actions that a factory assembly line would use.”
FAQs – Changing a Ceiling Lamp Holder
How do I know which wire is the ‘hot’ wire?
The hot wire is usually black or red. In the ‘One-Check’ method, this wire always connects to the brass-colored screw on your lamp holder to ensure safety and proper bulb function.
Do I really need to turn off the whole house power?
No, you only need to turn off the specific breaker that controls the room where you are working. However, always use a voltage tester to verify the wires are dead before touching them.
What if my ceiling wires are the same color?
In older homes, wires may be faded. Use a tester to identify which one carries the current. The wire that makes the tester beep when the switch is on is your hot wire.
Is it okay if the copper wire is showing?
A tiny bit of copper under the screw is normal, but none should be sticking out past the edge of the lamp holder base. If it is, trim the wire and reconnect it for a safer fit.
Can I use this hack for heavy chandeliers?
The ‘One-Check’ alignment hack works for the wiring, but heavy fixtures require a specialized support brace. Always check the weight rating of your ceiling box before hanging heavy items.
Why is my new lamp holder flickering?
Flickering usually means a loose connection. Turn the power back off and perform the ‘Tug Test’ on your wires to ensure the screws are tightened firmly against the copper.
What tool is most important for this job?
The non-contact voltage tester is the most important tool. It provides 100% certainty that the power is off, which is the key to working without fear or stress.
What is the ‘Silver Screw’ rule?
The silver screw on a lamp holder must always receive the white (neutral) wire. This ensures the threaded part of the socket is not electrified, preventing shocks during bulb changes.